
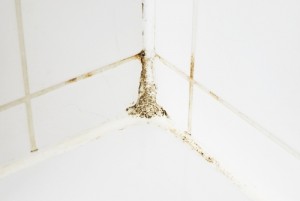
How to remove black mould from silicone sealant
Bathroom sealant is notorious for gathering mould, especially if it’s been left for a long time without preventative measures. If your silicone sealant has seen better days, and you want to banish that black mould once and for all, here’s a handy step by step guide on how to remove black mould from silicone sealant to ensure it stays away for as long as possible!
Related: Avoiding Structural Damage with Planned Maintenance
 How to remove black mould from silicone sealant: What you’ll need
If you’ve been meaning to get around to this cleaning job for a while, you’ve probably noticed the sheer number of different products which claim to stop mould in its tracks on the shelves.
Though there are purpose-made cleaning products which can give you some great results, you can often tackle black mould effectively with a handful of day-to-day products that you may already have in your home.
To use the method we recommend, make sure you have the following items:
- White vinegar
- Baking soda
- A cleaning cloth you don’t mind having to throw away
- A stiff-bristled brush
- A sponge with a coarse side
- Cold water in a receptacle like a bowl or bucket
- Thin bleach
The method
With your tools assembled, here’s a step-by-step method to cleaning off the mould:
- Mix a fine paste using 2-3 tablespoons of baking soda with 1 cup of white vinegar
- Use your cleaning cloth to gather up a small amount of your paste
- Rub the paste into the sealant, ensuring that you build a nice, thick layer over the places where the mould is most dense.
- Leave the mixture to sit for 5-10 minutes.
- Scrub the paste away using your stiff-bristled brush
- Use your cleaning cloth to rinse off the sealant with cold water.
- Repeat previous steps until no visible mould remains.
- To kill off any lingering, hard-to-see spores, create a solution of 1-part bleach to 4-parts water, funnel into a spray bottle, then spray it all over the sealant (even where you haven’t had much trouble with mould in the past).
- Rinse off the sealant with the cleaning cloth and water again, then dry the whole area with a towel of microfibre cloth.
Making life easier
Now that you’ve removed the mould, it’s time to take preventative action!
Here are a few steps to make sure the mould doesn’t come back:
Clean your bathroom, including the shower curtain, towels and furniture regularly to avoid giving the mould damp spaces to grow.
Keep the window wide open after showering, run a dehumidifier, or both. Some bathrooms are better-ventilated than others, but anything you can do to stop moisture gathering in your space will help keep mould at bay.
Invest in some houseplants that are good for removing humidity. Peace lilies, reed palms and English ivy are all great for this.
If you’re struggling to tackle home maintenance issues, get in touch with Groom Property Maintenance today and find out how we can help!